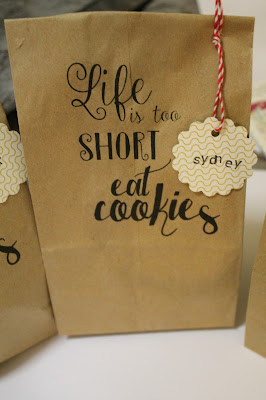
Life & Cookies // Thankful Thursday + Free Printable!
November 12, 2015Happy Thursday everyone! I hope that you're all bracing for the winter well! Today, I'm bringing you a super simple and easy DIY that you'll want to give to all of your friends! And besides who doesn't love cookies?! Look for the giveaway post here so you can follow the rules and enter!
To start off this project you'll want to bake some cookies. I made some chocolate chip cookies to give to my roommates and I just followed the recipe on the back of the chocolate chip package. Once your cookies are baked, you've got to get started on this easy packaging! You'll need some paper bags, a printer, washi tape, and some printer paper.
I must say that this was the first time I have ever attempted to print on paper bags and man, it was a series of trials and errors. So, now I'm here to pass my success on to you! I read several different takes on this on Pinterest, but I just ended up trying it my own way a few times and it finally worked! As you can see in the pictures above, there are several trials in the back and the final result is in the front. My first tip is to purchase more paper bags than you need. I messed up way more times than I thought I was going to.
To perfect printing on paper bags, you'll want to first see which way your printer prints. Mine prints upside down, so I had to be sure the image was the correct way for the way my paper bag was. Once you've printed out your test copy, you'll want to make sure it'll line up well on your paper bag. If everything is all set, grab a paper bag and fold the flap down (so instead of the way paper bags usually come, with the flap folded up one way, try and fold that side of the flap down). Then, take your washi tape and line up your bag with where it printed on your test sheet of paper. This will ensure that you'll have a lined up print of whatever you may be putting on your bag. Once you've lightly taped all sides of your paper bag, making sure that it'll print the correct orientation of your paper, when the non-open flap goes into the printer first, attempt to print one out!
Don't be scared of messing up or jamming your printer. I did several times and everything still turned out! To finish these cute bags, put in your treats and add a tag using some twine! I added their names to personalize each bag as well,
And here's your free printable link! (yes, I'm aware that it's upside down, because that's the way my printer prints and the way I orientated my bag!):
I hope you all enjoyed this Thankful Thursday idea and may it inspire you to share handmade kindness always. Don't forget if you comment on this post you'll be entered into my giveaway! Thanks for stopping by! *Giveaway is now closed*
Supplies:
*Purchasing anything through these links is part of an affiliate program and I will receive a small percentage of the sale through these links*


0 comments
Thanks for leaving a comment! I appreciate all feedback, suggestions, questions, and comments! Don't forget that you can find me on Instagram and Facebook to get more immediate feedback!
______________________________________
Compliance with the new European Union E-Privacy Regulation:
If you leave a comment on this blog, you do so with the knowledge that your name and blog link are visible to all who visit this blog, that you have published your own personal details and that you have consented for your personal information to be displayed.
This blog is currently made in the USA.